Posts tagged 'Software'

DriverMax Updates All Of Your Drivers In One Place

A couple of weeks ago I needed to fix a friends computer that suffered from an incurable case of BSoD syndrome. He had all of his data backed up to an external hard drive so the coast was clear to reformat and reinstall Windows. Piece of cake. The problem was how was I going to find all the right drivers to make his laptop useable again? He lost the drivers & utilities CD that came with his laptop. Enter DriverMax.

The main menu of the DriverMax software program.

DriverMax is a free program that scans your system and provides links to the latest version of drivers for the particular hardware you have. The process is straightforward as DriverMax handles downloading and installing the files for you. It can even generate reports of all the hardware devices in your computer as well as what driver version is being used. This handy tool saved me loads of time by not having to scour the Internet for the right driver or figuring out which one is compatible with my system. You can leave it running in the system tray and it will notify you when a driver update is available but for my purposes, once the computer is up and humming along normally, I simply uninstall DriverMax.

Interface for checking which drivers have updates in DriverMax.

The only downside I could think of is you have to sign-up for a free account to their forums in order to download drivers. It worked well for my friends laptop so if you need to do a clean sweep of a PC and you lost the driver disc that came with it, give DriverMax a whirl.

Picasa For The Mac Finally Available

I just read over on Techcrunch that Picasa for the Mac is finally ready. You can get it at http://picasa.google.com/mac/. I wrote about the rumors of Picasa on the Mac 10 days short of a year ago. The Mac version is nearly identical to it’s PC counterpart, interface and all. Check out the overview video embedded below.

One of the main reasons I like Picasa over iPhoto, the free photo program that comes with every new Mac, is Picasa keeps your folders in tact not forcing you to keep your library in a specific hierarchy. Plus, I find Picasa more intuitive and easy to use.

Picasa 3 for Mac Screenshot

Now I just need to figure out how to sync my photo library and information between my Mac and PC instances of Picasa.

If you haven’t tried Picasa yet, give it a whirl .It really is a great way to organize and edit photos.

Play DOS Games On A Mac With Boxer

Who needs fancy graphics and snazzy physics known in modern gaming? I prefer the creative, classic DOS games of yore to today’s hyper-real slaughter fests. Up until this weekend I had know idea how to play old DOS games on my Mac,and then I found Boxer.

Boxer Logo

Boxer is a DOS game emulator for OS X and is based on the open source project DOSBox. It packs a few little tricks to help you load and launch your games with ease. The problem is these tricks aren’t very obvious so I’ll give you a little walkthrough.

After downloading and installing Boxer, the first time you run it it will ask you to choose a designated game folder. Which ever folder you choose will auto-mount as your C: drive every time you start Boxer. From here you can navigate to the folder with your game in it and launch the .exe file. Wait, you don’t remember how to navigate around that black screen with a white blinking cursor? Yea neither did I.

Boxer DOS Emulator Screenshot

Luckily Boxer makes it a snap to run your games straight from the Finder. Just go to the game folder and add ‘.boxer’ to the end of it’s name. Now you can double click the folder and it will automagically launch in Boxer. Some games require you to have a CD-ROM loaded but Boxer can handle that too! Just make a copy of the game folder inside the game folder and add a ‘.cdrom’ to the end of it’s name. Boxer will automatically detect it and mount it as a virtual CD for you. Can’t get much easier than that!

Game Folder Rename Example

Other niceties include Mac friendly keyboard shortcuts like cmd+F for fullscreen view and cmd + up/cmd + down to increase/decrease the CPU speed. Other ones are listed on the Boxer site.

Now you can relive the gaming classics. If you need some ideas to get started take a look at the adventure game Sam and Max: Hit the Road or the first person that took the world by storm, Doom. Try your hand at the original Warcraft or one of my favorite turn-based strategy games Heroes of Might and Magic 2. Remember those old education games from the Learning Company like Treasure Mountain? There are a ton more games up for grabs at Abandonia, which is dedicated to abandoned DOS games and Squakenet.

Even thought these games might be old, they are still just as addictive. Be sure to give yourself some time to get sucked in.

Walkthrough: Setup Multiple IE Virtual Machines On A Mac

One of the most dreaded tasks every web developer faces is testing their pages in the multitude of browsers to make sure everything is working as it should. Until recently, that required having multiple systems lying around. Microsoft only let you install one version of Internet Explorer (IE) at a time due to the fact that it is built deep into the system kernel. Apple used to keep Safari to itself on the Mac operating system leaving the only option of buying Apple hardware to get at the browser.

While there have been several stand-alone versions of IE cobbled together, I just don’t trust them like a fresh native install. And it’s good to see how a site renders with the text rendering engine of the Mac versus the Windows rendering system. Now with virtualization tools like VMWare Fusion, we can have it all.

After installing VMWare and an instance of Windows you may be tempted to set-up another virtual machine specifically for another version of IE. But this is foolish because each XP virtual machine can take up a good chunk of harddrive space. Fortunately there is another way to accomplish this while saving a heap of space.

Below are the steps I took to download the free Virtual Disk images that Microsoft provides with a bare minimum installation of XP or Vista and IE6, IE7, or IE8 Beta. All that we need to do is convert them to a format that VMWare can use and we’ll be in business. The basis of this walkthrough came from Running IE6, IE7 and IE8 on your Mac by Jeremy Gillick. So let’s dive in…

  1. Go and download the version(s) of IE that you want from Microsoft. This can be anywhere from 330MB – 3GB
  2. Download Qemu-0.9.1-windows.zip. We’ll use this to convert the Virtual PC disk images to a VMWare compatible virtual disk.
  3. Start up your virtual XP machine and drag the two files onto the XP desktop.
  4. Un-zip Qemu-0.9.1-windows.zip to your C:/ drive so it will be easier to find later.
  5. Speaking of making things easier, it would help to rename the folder Qemu-0.9.1-windows to qmenu. This will come in handy later when we are typing up a storm on the command line.

    The file structure of qmenu.

  6. Double click IE7-XPSP2_VPC.EXE to extract the image. Save it to C:\qmenu. You should now see a .vhd file in your qmenu folder. Size wise it should be a little over a gig.
  7. Again, to make things easier to type later we shall rename XP SP2 with IE7.vhd to XPSP2IE7.vhd

    Renaming the VHD file for simplicity.

  8. Now it’s time to do the conversion via the command line. Fire it up by going to Start -> Run and typing cmd. Then press enter to launch the command line.
  9. Navigate to the qmenu directory by typing cd c:\qmenu
  10. Now type this line to run the actual conversion process: bin\qemu-img.exe convert -f vpc C:\qmenu\XPSP2IE7.vhd -O vmdk XPIE7.vmdk

    This is what you should type into the command line to convert your image.

  11. You will know it is working because all you will see is a blinking cursor on a new line. The amount of time it takes to finish converting can be anywhere between 10 minutes and an hour depending on your CPU.
  12. When you get back the C:\qmenu> with the blinking cursor you will know the process has finished. There will also be a new file called XPIE7.vmdk in your qmenu folder.
  13. Copy XPIE7.vmdk back to OS X by simply dragging it out of the VMWare window and onto your Mac’s desktop.
    Copy the VMDK to OS X
  14. Open VMWare Fusion and create a new virtual machine by going to File -> New.
  15. Go through the wizard and once you get to the Virtual Hard Disk page, expand Advanced disk options and check Use an existing virtual disk. Use the drop down to select Other… and go find the .vmdk file you just copied over.

    Setting up the VMWare image.

  16. Finish the wizard and boot it up. If prompted to upgrade the virtual harddrive, click Yes.
  17. Install the VMWare tools by going to Virtual Machine -> Install VMWare Tools as soon as Windows boots up. Now you’re done!

    Install VMWare Tools for better performance.

You should have a dedicated IE machine that you can test your web pages in. Mine weighs in at a mere 1.06GB compared to the typical multi-gigabyte requirement of a full install.

Final IE7 Install

Before you go rushing off in a state of web development nirvana, it should be noted that you will have to do this every three months as the Virtual PC images that Microsoft gives out expire. This is done to deter free loaders from using the OS for real work. But since you should only use it for testing purposes, it won’t be a big deal to delete the image and start this process anew every couple of months.

Happy testing!

Meet Snardr, My Spore Creature

Everyone on the net is buzzing about Spore, the latest simulation game from The Sims creator Will Wright. The idea behind Spore is you create your own free-form creature and guide it from a simple-cell organism to an interstellar exploratory civilization.

The game is being praised for its social features built right in to the game like profile pages for your creatures, YouTube integration, and the ability to interact with other players characters in your game. The full game will be released in September but the Spore Creature Creator was released yesterday.

There’s not much to do in the creature creator except for, well, creating creatures. It’s similiar to (and just as addictive as) the Mii Creator found on the Nintendo Wii. After opening it up and getting my orientation with the program I started working on my first creature: Snardr.

Snardr Spore Creature

Aww isn’t it cute. But some people have gotten a bit naughty making phallic creatures, for example. A quick search on YouTube brings up more than 350 Spore Penis Creatures The Spore Penis Monster is my favorite. I guess it is to be expected.

What does one of your Spore creatures look like?

I Participated In Firefox Download Day, Did You?

Firefox Download Day 2008 Certificate

Today is June 17th and that means Firefox 3 becomes official. After several betas and release candidates the successor to the #2 browser in the world has finally been thrusted upon us. You might want to skip Firefox 3 if you don’t use any addons, only use one tab at a time and/or enjoy a slow, bogged down web browser. Besides better memory management, the new “awesome bar”, and refreshed interfaces that better integrate into the look of your operating system, Firefox 3 manages to pack in over 15,000 other improvements.

To draw attention, the folks at Mozilla headquarters decided to break the Guinness record for the most downloaded software in a 24 hour period. Hence Firefox Download Day was created.

I updated Firefox on my MacBook Pro, on my Windows XP virtual machine running in VMware, my ancient PC at work, and even my huge Windows laptop. That last update was particularly tricky as the wireless card for my desktop replacement died and I had to tether it to my Mac via a cross-over cable. Here is a picture of the irony.

Apple makes a great $2700 wifi card.
Apple makes a great $2700 wifi card!

How many computers did you update today?

P.S. Get your own certificate.

UPDATE: Now you can track the number of downloads in real-time as well as see the average number of downloads per minute!

Stats On How I Will Probably Die

Sorry for the grim title but I just discovered this great infographic featuring statistics of how men in the United States will die in 2008. There are various causes covered including suicide, heatstroke, and electrocutions. The data was collected from the CDC’s WONDER Database. WONDER stands for Wide-ranging Online Data for Epidemiologic Research which is a collection of data that’s available to public health professionals and the public at large, boasting a wide array of public health information.

Thanks to this it looks I don’t have to worry about shark attacks (1), foreign objects left behind during surgery (2), or fireworks accidents (5).

Broken Image

UPDATE: This originally appeared in the November 2007 issue of Men’s Health and was designed by Julia Hoffman.

UPDATE 2: From Sean Nolan, Director of Men’s Health Online

Please remove the copyright-protected graphic from Men’s Health magazine currently at this URL:
http://www.russellheimlich.com/blog/stats-on-how-i-will-probably-die/
You do not have the permission of Men’s Health to us it.

Sorry people!

Fuelfrog Lets You Track Gas Mileage Through Twitter

There are many web services and tools that can be used with Twitter. Such oddball web service/Twitter mashups include TrackThis which sends you a twitter message every time the status of a package you are tracking changes, and Timer which helps act like an alarm for things you need a reminder about. But I just stumbled across Fuelfrog which is one of the more useful collaborations.

Fuelfrog provides a simple service allowing you to track your cars mileage per gallon as well as the average price you pay at the pump. Using their website you enter 3 things: the miles you traveled since your last fill up, the price you paid per gallon, and the total number of gallons you bought. Fuelfrog will then tally your findings and provide you with some handy specifics over time. I only started using the tool today but the site will tell you the frequency you are filling up, the average MPG your car gets and the average price per gallon you are paying. In the future they hope to let you compare your performance to other vehicles to see how you are doing.

Fuelfrog.com helps you track your cars average MPG as well as what you pay at the pump.

This simple tool comes in handy for tracking the performance of your car. My parents used to do this manually by writing down the mileage from the trip odometer onto the gas receipt and do the number crunching later at home. But thanks to Twitter integration I can ditch the pen and paper and simply tweet my gas stats straight to Fuelfrog. After providing my twitter username (kingkool68) I can now send a tweet from my phone to @fuelfrog with the miles, price per gallon, and total purchase amount in that order. A handy nemonic is MPG – Miles, Price, Gallons. There is also a Windows Mobile app if you want to be lazy about it.

I’m going to be using this over the next couple of weeks to see if I notice any patterns about my fueling habits. At the very least I can look back and remember when gas used to only be $3.71 a gallon!

(via DownloadSquad)

Use MSGView For Viewing .MSG Files

On my commute home from work this evening I came across a lost thumb drive at one of the metro stations. I decided to take it home and see what was on it. As much as I would have loved to stumble across some top secret military documents or a bunch of MP3 files all that was on the 128mb drive was some miscellaneous e-mail messages. Being the good samaritan that I am, I decided to reconnect the device with it’s rightful owner.

The e-mails were all .msg files, the file extension for Outlook message files. Since I don’t have Outlook installed on any of my computers or a program to read them I had to find some freeware to do the job. After a quick Google search I found the no frills MSGView from Priasoft. The program is a single executable (with nothing to install) that prompts you to locate a .msg file upon starting it up. From there it decodes the message from the proprietary Microsoft e-mail format and shows you the contents. The biggest pain was that I had to close MSGView and re-open it if I wanted to look at another e-mail document.

MSGView Screenshot from Priasoft

I decided to sort the e-mails by file size in hopes of uncovering a conversation that sheds light on who the owner is. After a couple minutes of sleuthing around I quickly connected the dots and found the name and e-mail address of the likely thumb-driveless metro rider. I sent them an e-mail and have yet to hear back from them but I did learn about MSGView which comes in handy in situations like this.

Configuring The Logitech MX Revolution Mouse

Kristina got me the mouse I have long been eying to replace my 5-year old Microsoft Wireless Explorer Blue mouse: The Logitech MX Revolution. It was an early anniversary gift as our 7 year anniversary is this Friday, March 21st. Logitech claims it is the most advanced mouse in the world and after dragging it around my screen for a minute or two I whole-heartedly agree. It works fine as a regular mouse, but where the real power is in the advanced configuration of the many buttons. Furthermore, you can program the buttons to do different things in different applications providing total flexibility with integration into your workflow. Since Firefox is the main application used on my PC, I decided to turbo charge my mouse shortcuts for speedier web surfing.

Logitech MX Revolution Mouse Diagram

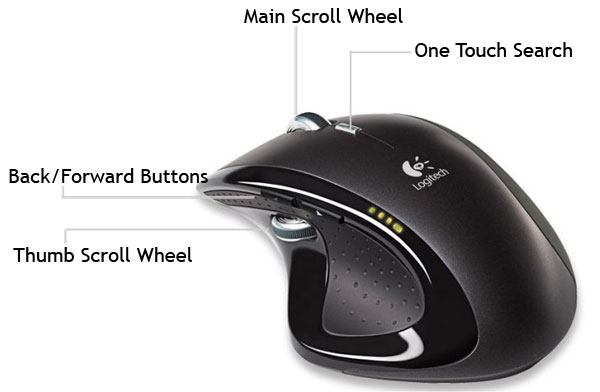
The first part was easy. The standard conventions of left-click, right-click, and the scroll wheel would remain in tact. The tried and true middle-click which I rely on to close tabs or open links in new tabs, is no where to be found (more on this later). Instead I have set up the clicking of the main scroll wheel to switch between two different scroll types. The Logitech MX Revolution can be controlled via software to scroll in click-mode or free-wheel mode. Click-mode is just like any other mouse scroll wheel with each turn producing a click. This is used for more precise scrolling. But if you need to get through a long web page in a short amount of time, free-wheel mode will let you spin the scroll with a mighty flick and continue scrolling for up to 7 seconds. Sure makes getting around the largest web page in the universe a lot easier. If you wanted you could define the default scroll-mode in specific applications. I found this difficult to get used to so I set the global behavior to be free-wheel mode with middle clicking switching to click-mode.

Moving on in Firefox, the back and forward buttons naturally would correlate to the back and forward buttons of the browser. This was a no brainier. But the thumb wheel left me puzzled about what task to assign to it. This wasn’t like the main scroll wheel but instead more like a lever that you could push up, down, and in with your right thumb. One interesting combination is to map the copy (Control + C), paste (Control + V), and cut (Control + X) commands to the up, down, and pushed-in positions respectively. In Firefox I find myself switching through tabs a lot so I decided to map Control + Tab (switch to the tab to the right), Control + Shift + Tab (shift to the tab on the left), and Control + W (close tab) functions to the thumb wheel. This set-up works great when tackling the daily news reading I do.

Of course if you have become used to the middle click opening links to new tabs, then you will want to install the free uberOptions which gives you a wide range of additional options for configuring your mouse. I set my one touch search button to perform a middle click. It’s a little out of the way from my index finer, but I can deal with that. The main scroll wheel itself is a bit too heavy to push in multiple times. Besides, Logitech’s configuration software, SetPoint, doesn’t let you assign a click function to this button.

It took a bit of experimenting but I believe I have settled on the ideal set-up for my mouse. This thing is such a joy to use I wish I had taken the leap sooner. If you are in need of a new mouse and you take personal configuration seriously, then the Logitech MX Revolution is a perfect pointing device for you.

What are some handy mouse or keyboard shortcuts that you rely on?

*If you’re more of a keyboard-shortcut kind of person, thanks for reading all the way through. I appreciate it :-)