For the past week I have been fiddling with Postie, a WordPress plugin that allows posting via e-mail or a mobile phone. The following instructions are specific to WordPress 2.2, Postie 1.1.1, and a DreamHost server. Most information in this walk through can be applied to other configurations but, as a disclaimer, your mileage may vary. I will assume you have a stable WordPress installation already up and running.
First we need to download and install the Postie plugin. To get the files, go to http://www.economysizegeek.com/?page_id=395 and download Postie version 1.1.1 for WordPress 2.1 or higher or get Postie version 1.0.1 for WordPress 2.0. If you’re running an older version of WordPress you will need to look around for an earlier version of Postie.
Unpack the Postie plugin and upload it to your plugins directory at wp-content/plugins/postie. Login to your WordPress Admin interface and click on the Plugins section. Postie should now be a listed plugin; simply click Activate to turn it on. If you go to Options and then the Configure Postie subsection you will see the many configuration options to tweak Postie just the way you want it. There are too many options to explain here, besides most of them need no explanation.
In order for Postie to post the e-mails you send it, you need to authorize your e-mail address. Any e-mail not listed here will be rejected with the option for you to be notified so you can see who is trying to mess with your system.
Defining the directories where Postie will save your images to is pretty important. The default location is within your blog installation root, but this was causing some problems when I ran the configuration test later on. I ended up setting the directories in the Postie folder, or /wp-content/plugins/postie/wp-photos/ and /wp-content/plugins/postie/wp-filez/. These seemed to fix the issues running the tests and when I finally posted images on my blog but I don’t know how important it is to change this.
The banned files list lets you strip out the unnecessary clutter mobile carriers tack on when you send an e-mail or removing signatures. It’s best to send an e-mail to yourself just to see what kind fluff gets added to your message.
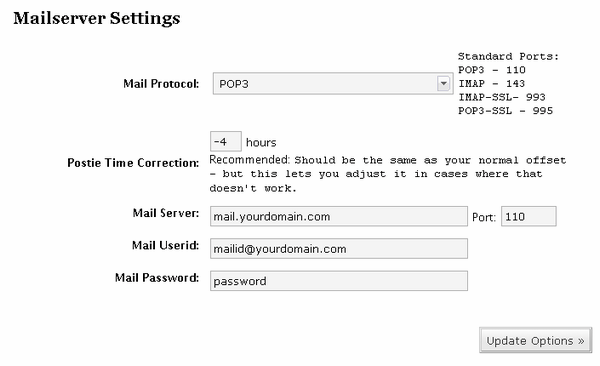
Image settings and 3GP settings can be set to taste, leaving us at the most important configuration — the Mailserver Settings. Postie supports Pop3, Pop3 SSL, IMAP, and IMAP SSL. However Dreamhost doesn’t have IMAP support in their out-of-the-box PHP installation. If you really want these features you can always compile your own PHP installation but for our purposes we will just stick with basic Pop3.
You need a mail server that will let you authenticate over a non secure connection. This means Gmail is out because you need Pop3 with SSL in order to authenticate your account. DreamHost users can use their own mail server usually at mail.yourdomain.com with the default port of 110. Your mail ID needs to include the domain name at the end like [email protected]. This step really hung me up since it was never made clear. If you want a super hard to guess mail ID use GRC’s Ultra High Security Password Generator. Nothing like a bunch of random characters to ease the mind of the super paranoid. Click Update Options to save your changes.
Now we should have everything set-up so we can begin to post from the field. To make sure things are working ok, run the Configuration Test. This will let you know if your mail settings are correct and if Postie can find and write to your image and filez directories. Hopefully everything checked out ok here. If they didn’t go back and double check your settings.
Now we can go back and run Postie manually. Before doing this we need to have a message on the mail server for Postie to grab. Hit the Run Postie button and watch in amazement. You’ll know if Postie pulled your message down otherwise you will most likely get the vague message There does not seem to be any new mail. If you do get that message, check your e-mail account to verify there is an unread message sitting there. If that’s not the problem it is most likely an authentication or mail ID issue.
Check your blog to see what Postie did with your current settings. If it is outputting something different than you expected, go back and tweak the settings, send a new message to your e-mail account and run Postie again. I didn’t like the markup coming from Postie so I went into the /wp-content/plugins/postie/postie-functions.php file and cleaned up a little bit.
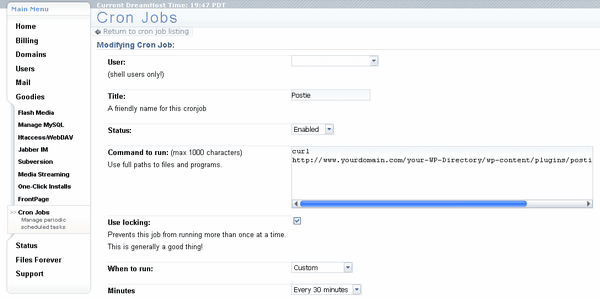
We are almost done setting up Postie. All that is left is to set-up a CRON Job in order to run Postie at a specified interval. As it is now we would have to login to WordPress and manually run Postie whenever we wanted to make a post via e-mail. Normally you would have to shell in and type a bunch of archaic commands into a Unix prompt to set this up, but DreamHost makes this easy with their Cron Jobs tool. Login to your DreamHost Panel at https://panel.dreamhost.com and click on Goodies -> Cron Jobs. Click Add New Cron Job and copy and paste the following command, replacing the domain info with your own.
curl http://www.yourdomain.com/your-WP-Directory/wp-content/plugins/postie/get_mail.php
When this CRON Job is run, the server will go to the URL, triggering Postie and publishing your post. Be careful when determining the interval for running the CRON Job because running it too frequently uses CPU cycles and shared hosting companies don’t really like that. Running once an hour should be fine for most needs.
A major drawback of this approach is any special formatting options like DIV containers and special markup will not be included. This is because when you actually login to your WordPress blog it sets a cookie which then allows the special markup to be included. A way to do this would be to use code like this :
curl -c [cookie file] -d log=[username] -d pwd=[password] http://[your blog’s address]/wp-login.php

now you stored the cookie WP gives you upon login. let’s use it:

curl -s -b [cookie file] http://[your blog’s address]/wp-content/plugins/postie/get_mail.php >>/dev/null
Unfortunately Postie meets my needs thus far and I haven’t figured out how to set up the CRON Job in the previous way. You are on your own now.
I hope this guide has given you some clarity about setting up Postie and if I missed anything please let me know in the comments and I shall update this guide.
Further Reading